
Welcome to our tutorial on how to add a Pricing Table widget to your web project.
Enhance your site with a sleek, responsive, and lightweight pricing table widget for seamless integration and clear pricing display.
Whether you want to improve user experience or create a more interactive website, a Pricing Table can be valuable. This article will walk you through integrating our Pricing Table widget into your web project.
Why Every Website Needs a Pricing Table?
A pricing table offers a visually appealing way to display your product and service packages side by side, highlighting the features, benefits, and costs.
Below are the key advantages of adding a Pricing Table to your website:
- Increased Credibility: A pricing table clearly discloses everything upfront, including the cost of each package and the features to expect. This helps establish your business as transparent, which encourages clients to trust your offerings.
- Boosted Conversions: Displaying a pricing table on your website enables clients to skim through the packages and select their preferred one. This reduces decision fatigue and drives more sales (conversions) for your website.
- Improved User Experience: A well-designed pricing table complements your website’s visual appeal, encouraging visitors to spend more time exploring features, comparing tiers, and analyzing benefits, which boosts your engagement.
Want to track the engagement and impact of the table? Use a pricing table widget with built-in analytics to track how users interact with the offered packages.

Key Elements of an Effective Pricing Table
A pricing table offers more than just a catalog where website visitors can check your products. It enhances your website’s visual appeal and engagement, both of which impact conversions.
Below are essential elements to include in your pricing table:
- Tiered Pricing: Clients should have the option to choose a basic, standard, or premium plan, depending on their usage needs. Additionally, tiered plans enable upselling higher-value packages by highlighting added benefits at each package level.
- Concise Features: The pricing table should only display the key features that potential buyers need to inform their purchase decisions. Highlight the core features and USPs in bullet points to make them easily scannable.
- Visual Cues: Leverage design elements such as color shades, icons, and borders to guide visitors toward the option that offers the best balance of features and affordability.
- Trust Signals: Display testimonials, customer reviews, security badges, or guarantees to reassure clients that they are making the right choice. These signals prompt first-time customers to make their purchasing decisions while still on your website, thereby boosting conversions.
- Visible CTA button: A well-designed pricing table should have a clear and compelling call-to-action button, such as “Get Started” or “Buy Now.” Additionally, the button should stand out with contrasting colors and be visible without scrolling. You could even add an Exit-intent Pop-up widget with exclusive offers to create a sense of urgency and nudge customers to act promptly (such as buying a plan).

How to Choose the Right Pricing Table Generator
The best way to display prices on your website is to use a pricing table generator. The widgets let you set up and customize your pricing table without coding.
There are at least a dozen pricing table generators in the market. So how do you choose the one that meets your needs and complements your website’s functionality?
Use our cheat sheet below:
- Simplicity: Pick a pricing table generator with an intuitive interface that is easy to use and customize, even for users with limited technical skills. For instance, generators with pre-built templates and drag-and-drop features allow even marketing teams to create tables without needing technical support.
- Cross-Platform Compatibility: The pricing table generator should seamlessly integrate with the systems you use, including your CMS, e-commerce platform, and website builder.
- Flexible Customizations: Opt for a versatile pricing table generator that enables you to select your preferred widget colors, fonts, and layouts. Some widgets may even include toggles for monthly vs. yearly pricing to boost visitor engagement.
- Advanced Analytics: Pricing table generators with built-in analytics tools enable you to monitor user behavior for insights on refining your subscription plans. For example, you could track which plans visitors click on but then abandon, and find ways to optimize them, such as adding features or discounts, to increase conversions.
- Responsive Design: Choose a pricing table generator that uses a mobile-first design with fluid grids and layouts so that visitors have a consistent user experience across devices.

Add Pricing Table Widget to Website – Step by Step
This section provides a complete guide for integrating a Pricing Table widget into your website.
We’ll first outline how to create the Pricing Table widget, followed by instructions on how to paste it onto your website.
Create a Pricing Table Widget Using Webynize
Follow these steps to set up and personalize your Pricing Table widget:
- Sign up for Webynize and visit our pricing page to pick a plan that works for you.

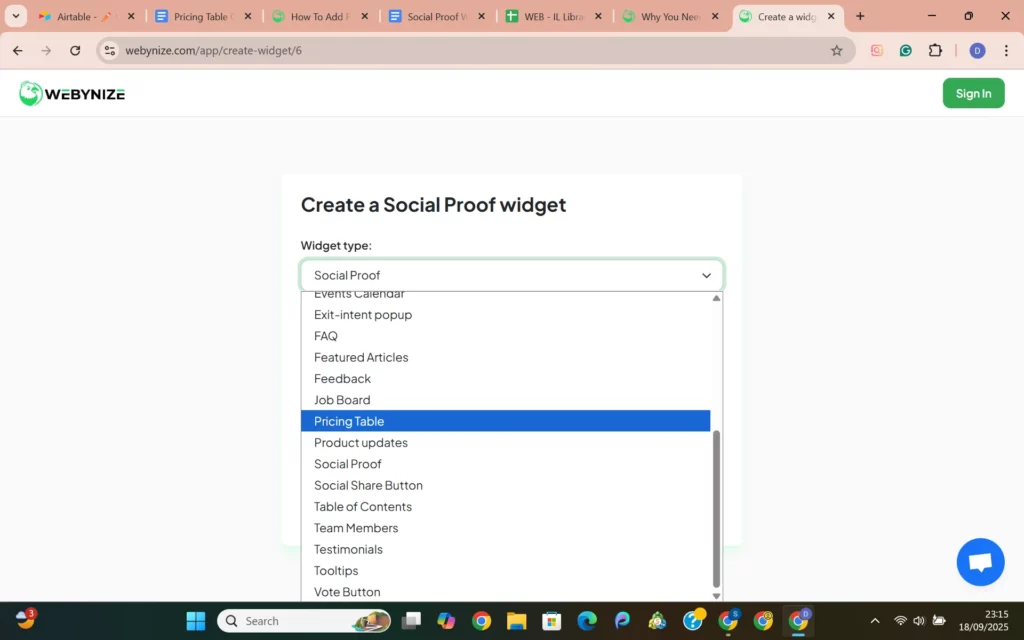
- Click +Create Widget to launch our Webynize widget library and select Pricing Table from the drop-down menu.
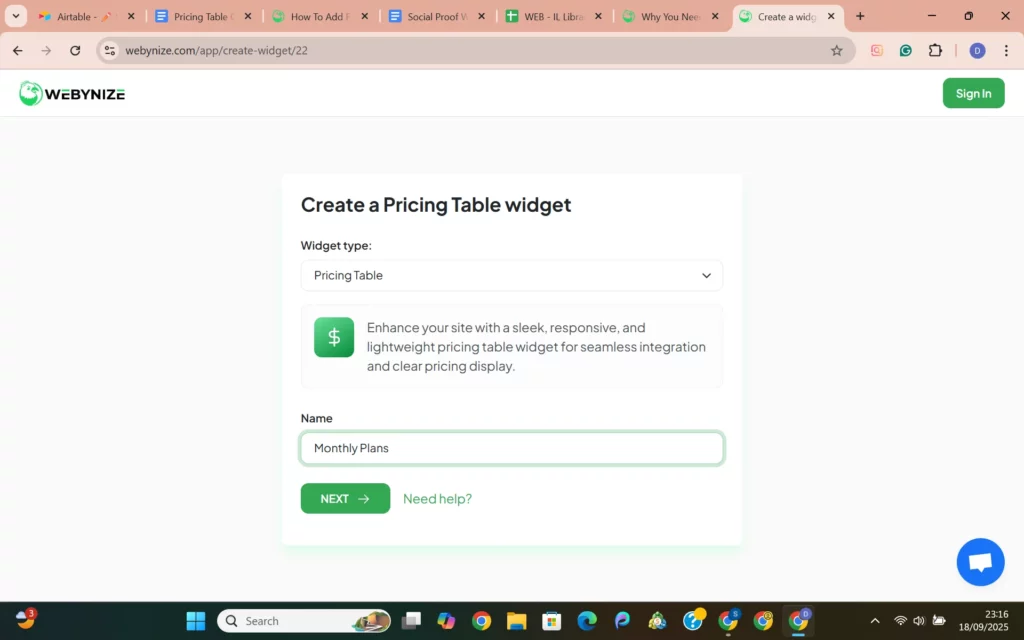
- Provide a custom name for your Pricing Table widget and click Next to open the editor panel.
- Navigate to the Plans section and click Create New Plan to set up your pricing table.

- Customize the Pricing Table widget to match your website or brand theme by selecting your preferred background color, text color, and font size.
- Click “Embed on Website” and select the website type to generate the script.
- Copy the JavaScript code that appears on the pop-up.
Add the Pricing Table Widget to Your Website
Next, let’s discuss how to add the embed code to your website:
- Log in to your website admin dashboard and open the web page where you want to add the pricing table generator.

- Choose a new section and open a code editor, rich text editor, or code block, depending on your website builder. Here’s an example of a code block on WordPress.

- Paste the JavaScript code you copied from Webynize.
- Preview the changes, then save and publish.
And just like that, the pricing table should be live on your website!
Sign up for Webynize today and customize a Pricing Table widget to facilitate product comparisons and encourage clients to quickly commit to their preferred option.
Mistakes to Avoid When Using a Pricing Table Generator
A poorly designed pricing table can hurt your website’s UX and conversions.
Below are common pitfalls to avoid when adding a pricing table to your website:
- Too Much Information: Adding long-form content to your pricing table drowns out your USPs, which could overwhelm potential clients. Additionally, it negatively impacts your website’s UX, particularly for users interacting with the pricing table on mobile devices. Instead, only list the key value points so the table is easy to scan.
- Missing CTAs: Omitting a CTA statement on the pricing table buttons results in missed opportunities for nudging customers to commit to a plan right away. Simple phrases like ‘Don’t Miss Out On Our Discounts’ help create FOMO, boosting conversions.
- Not Highlighting the Recommended Plan: Failing to highlight the ‘best package’ exposes your potential leads to decision fatigue. They may also feel they need more time to make their purchase decision, which could result in lost sales. Instead, offer a mid-tier package that feels feature-rich and affordable to most users.
- Hidden Pricing: Unless they want a custom package, requiring interested customers to contact you for pricing could taint your brand’s credibility. State the prices clearly and outline the expected features to demonstrate the value for money.

How to Customize Pricing Table for Better Conversions
Adding a pricing table to your website is only one part of the job. You should customize it to maximize visitor engagement and drive conversions for your business:
- Have a Clear Pricing Model: Clearly indicate how your plans are priced, such as periodically (monthly, quarterly, or annually) or based on the number of seats (users).
- Keep It Scannable: Organize the information logically so that the pricing table is easy to read and understand. For example, use labels for the plans and then list the key features using bullet points.
- Make the CTA Stand Out: Craft a compelling call-to-action statement encouraging visitors to commit to a plan. Also, ensure the action buttons are prominent and inviting.
- Limit the Options: Include fewer than five plans so that visitors feel they have options without overwhelming them. This encourages them to select their preferred plan promptly, thereby boosting conversion rates.
- Provide Social Proof: Add a Social Proof widget to your pricing page to reduce visitors’ purchase anxiety and encourage them to make their purchase decision while still on your website.
- Ensure Mobile Responsiveness: Ensure your pricing table is dynamic and autoresponds to different screen sizes, so you don’t miss out on mobile users, who account for over 50% of all website traffic.

Need Support?
This tutorial has helped show you how to add a Pricing Table widget to your web project for FREE!
If you have any questions or need further assistance, please get in touch with our support team using the chat box on the lower right corner of this page.

Frequently Asked Questions (FAQs)
This section answers commonly asked questions about displaying a pricing table on a website:
What Is the Best Way to Display Pricing on a Website?
The best way to display pricing on a website is to offer distinct plans that clearly outline the package features.
This helps shoppers compare the available options so they can settle on the plan that best suits their needs.
Can I Add a Pricing Table Widget Without Coding?
Yes. You can add a pricing table widget without needing to code. Most widgets have a built-in embed code generator that creates the script, which you only need to paste on your website.
How Many Plans Should a Pricing Table Include?
There’s no limit to how many plans you should include in a pricing table.
However, we recommend limiting the number to three or four to give visitors options without overwhelming them, as this could cause decision fatigue, causing them to bounce off your website.
Should I Show Monthly and Yearly Pricing Together?
Yes. You should show monthly and yearly pricing together to accommodate all visitors.
Some shoppers may only need your product for a few months, while others may need it permanently.
Conclusion
Adding a Pricing Table widget can be a simple and effective way to gather valuable insights from your customers and improve the overall user experience of your web project. Also, it invites users to interact with the feed, encouraging them to stay on your website longer, which creates lead conversion opportunities.
Webynize is the go-to widget for website owners experiencing low visitor engagement. Our widget auto-generates the script to add to your website, so you don’t need to be proficient in web design.
Create a webynize widget and highlight your best plans to boost conversions.
We wish you the best of luck with your new Pricing Table widget!


